
« Shaft tube and bearing assembly »
Many of your designs call for fibreglass sterntubes. What are the pros and cons of glass tubes and where do I get these?
Stern gear components have been changing in recent years.
Bronze Sterntubes
Traditionally the standard was a bronze stern tube threaded into a cast bronze bearing carrier at the outboard end, and into a cast bronze stuffing box fitting on the inboard end. In many applications I think this is still the superior way to go. These sets are still available from most stern gear suppliers. The builder simply provides the length between wood faces and the shaft diameter required and the manufacturer does the rest. See Figure 1.
 Figure 1. Standard bronze sterntube components
Installing Bronze Tubes
To install a tube of this type, the builder will bore the hole through the stern deadwoods to a push fit on the tube. This is easily done with a boring bar running in a predrilled pilot hole. (A more detailed explanation of the operation of a boring bar will follow.) The boring bar will also be used to cut the recess for the spigots on the castings which will be a little larger than the tube.
The most important thing is to get the wood faces perfectly square to the base of the castings at either end so that when the lag screws are drawn up the alignment of shaft and bearings is not distorted. The technique to check this is to screw the bearing carrier onto the tube and apply paint to the casting face. Then slide the tube in until the casting comes up against the face of the sternpost. Withdraw it and the paint mark on the wood will indicate the degree of fit. If it is not bearing solidly, pare off the paint marks with a sharp chisel or spokeshave and repeat. When the fit is good outside, go inside the boat and screw the inboard casting onto the end of the tube with paint on its face and draw it up until it bears on the face or the deadwood. Back it off to see the fit and adjust as necessary.
When the end fittings are bearing properly on the wood, remove the tube, paint both hole and tube with red lead and work the tube back into place. Wrap a couple of turns of caulking cotton saturated with paint around the end of the tube under the casting, and push the tube home. Do the same inside, tighten the castings up on the tube and bore off for the lag bolts.
Fibreglass Tubes
Advantages and Disadvantages
Fibreglass tubes bonded in place with epoxy resin are a modern alternative to the traditional bronze tube. They have the advantage of being completely inert and not subject to the electrolytic corrosion that is sometimes seen with bronze. They are also cheaper - much cheaper if the builder makes them up himself.
The disadvantages of glass tubes are that they are not suitable in all applications. If you have a traditionally build boat whose sternpost and deadwoods are large chunks of semi-seasoned oak, it obviously wouldn't be sensible to rely on a tube bonded in with epoxy. In an all-glued boat with laminated backbone, on the other hand, it would be fine.
A glass tube will also have a larger outside diameter than a bronze one. In some instances that can be a serious drawback. If the designer hasn't made allowance for the extra diameter in sizing the sternpost and deadwoods, it is easy to find there is very little wood left either side of the hole. It is a good idea to check the tube O.D. with your supplier before ordering. On the positive side, a fully bonded tube will add strength to the structure in a way the traditional bronze tube doesn't.
Most stern gear manufacturers will supply fibreglass sterntubes with the cutless bearing ready installed outboard and with the inboard end machined to receive either a rubberneck type stuffing box, or a modern dripless gland.
When ordering fibreglass sterntubes bear in mind that the tube must project outboard of the sternpost about one third the bearing length in order to provide access to the locking screws that hold the bearing in place, and also to get the propeller far enough back for good water flow.
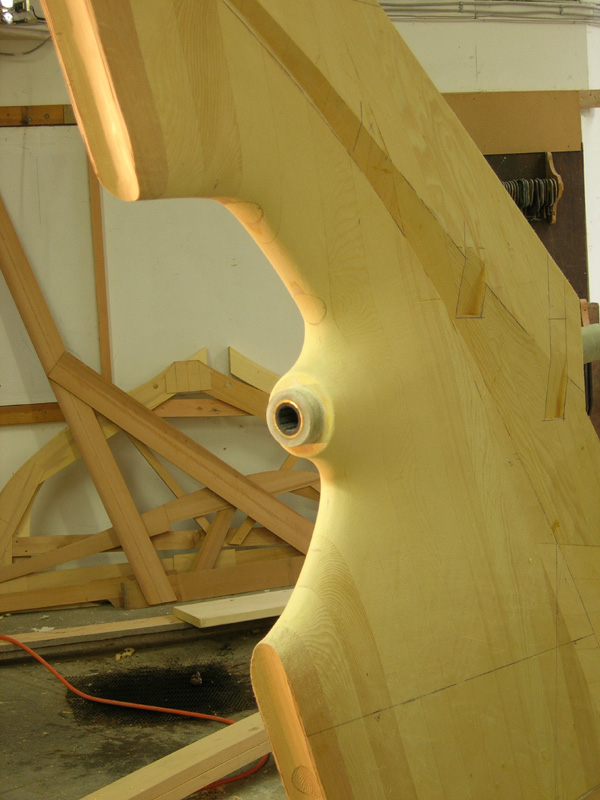
This last is very important if the propeller is to operate efficiently. Ideally the back of the propeller hub should be not much more than one shaft diameter aft of the bearing in order to avoid excessive side load, which means that with a glass tube the propeller gets pretty close to the sternpost. The cast bronze bearing carriers used with a bronze tube get the bearing much farther aft. When using glass tubes I prefer to cut back and fair the deadwood, rather than have an excessive length of exposed tube, which seems to me a weakness. See Figure 2 for an example of stern deadwood faired for a glass tube.
 Figure 2. Deadwood fairing around fibreglass sterntube
How to Build a Fibreglass Sterntube
It is perfectly feasible for home builders to make their own sterntubes using glass cloth and epoxy resin. The method that follows originated with my friend Doug Barron, a boatbuilder of great ingenuity. I have built four tubes this way now with good results.
In this method glass cloth and epoxy resin are built up over a liner of either copper or PVC tube. We have used both. The choice will turn on finding a tube which gives the right clearance on the shaft (not less than 3/16 inch all around), and is a close match to the O.D. of the cutless bearing.
Score the outside of the liner tube with spiral saw cuts to ensure a good mechanical lock to the glass. (See Figure 3.)
 Figure 3. Liner tube scored with saw cuts.Assemble the tube on a dummy shaft to ensure accurate alignment. Use rings of masking tape as shown to achieve a push fit inside the liner tube. Butt the bearing tight against the liner and hold it in place with five minute epoxy, attaching another short length of liner tube at the after end of the bearing. (This will be trimmed off later.) It may be possible to clamp it all up tight with a little creativity, but be sure to avoid getting resin in the bearing.
Vaseline the bearing carefully so that the glass will not stick to it and it will be posible to remove it when it becomes worn. Now, the trick is to get just a couple of wraps of glass and epoxy on to start with. We use 6 or 9 oz. cloth and prewet it so that it can be laid with the minimum disturbance to the Vaseline. Pull it up good and tight and allow to cure. Once this has kicked and any rough edges have been removed, it is a simple matter to build up the tube to the desired thickness by rolling on more cloth and resin. The shaft should be set up in V-blocks so that it can be rotated easily. (See Figure 4.) Roll on and wet out the cloth to a thickness of approximately 1/4 inch.
 Figure 4. Dummy shaft assembled with spacers, bearing and liner.
We usually thicken up the aft end over the bearing to about 3/8 inch so there is plenty to drill and tap for the lock screws. This means the hole in the deadwood will have to be enlarged too, but with a boring bar, this is quite easy. The forward end of the tube is sanded and filed to create a 1/16 inch lip to help grip the rubber hose connecting it to the stuffing box. (See Figure 5.)
 Figure 5. Detail of ends of shaft tube.
Installing tube and bearing
To install the tube, bore out a close clearance hole for the tube and check fit and alignment. (See Figure 6.)
 Figure 6. Boring the shaft hole in stern deadwood, using a boring bar.
Bore a couple of 1/2" holes through the deadwood into the shaft hole from inside the boat to allow resin to be pumped into the center of the tube hole.
Plug both ends of the tube and coat it and the hole well with thickened epoxy. Work the tube into the hole. Pour thickened epoxy into the 1/2" holes and using a 1/2" dowel as a plunger, force the resin in around the tube until all air is purged and solid resin is emerging at either end. This procedure is the same whether the tube is built or purchased.
 Share
Share
Reader Comments (1)
Nice one - I think this post is going to go viral!